Wednesday, April 30, 2014

How to: Granny Squares

     Granny squares are most popular when they are joined together as a blanket, although you could make a hat or a sweater with them.
     They are also probably the most basic thing you can learn with crocheting... and I completely forgot about them until just recently. Oops.  *grin*

     To begin, chain six.


     Join the first stitch to the sixth with a slip stitch.


     Chain three. This will count as your first double crochet stitch.


     Double crochet two stitches into the middle of the ring and chain two.


     Make three double crochet into the ring and chain two. Do this a total of three times.


     Join your chain two to the top of your chain three with a slip stitch.


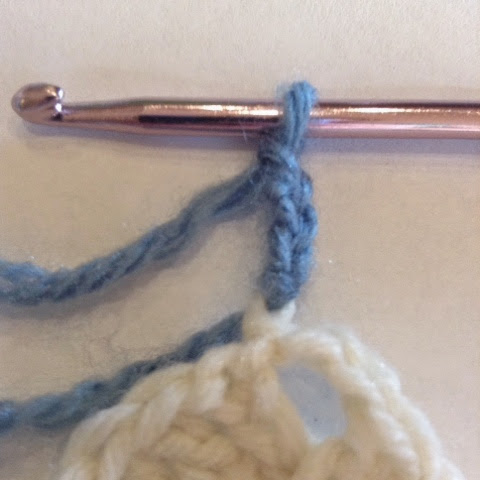
     For the next row, join a new color by making a slip knot around your hook and pulling it through the white stitch.


     Chain three and double crochet two into the gap between bunches. Like before, your chain three counts as a double crochet stitch.


     *Chain two over the crochet bunch.


     Make three double crochet into the corner and chain three.


     Make three more double crochet into the same gap as your previous stitches.


     Repeat from * until you reach the end of the round.


     Chain three and join it at the top of the first chain three with a slip stitch.


     Join a new color the exact same way as the previous row, double crochet two, and chain two.


     Double crochet three into the gap between the bunches and chain two.


     Continue like the previous row, making three double crochet into the gap(s) between the bunches for as many rows as you would like.

     You have just completed a granny square!


Sunday, April 27, 2014

How to: The Whip Stitch

     The Whip Stitch is used to sew the edges of garments together (such as the bottom of a purse or the sides of a sweater). It is really, really easy. You will need a large-eyed needle to do this.

     First, place the edges of the garment on top of each other.


     Then, insert your threaded needle through the first stitches on both the front and back edges.


     Pull the yarn through and repeat on the next stitch.


     Your sewn up edges will look like this.


Saturday, April 26, 2014

How to: Kitchener Stitch

     The Kitchener Stitch (also known as grafting) is an easy way to join sections of a garment together. 

     First, you will need two knitting needles with their tips pointing in the same direction and their purl sides inward. Then you will need a threaded needle.


     Note: These two steps are only done once.
     Insert your threaded needle into the first stitch of the knitting needle closest to you as if to purl. Pull the yarn through and leave the stitch on the knitting needle.


     Then, insert the needle into the first stitch on the back knitting needle as if to knit. Pull the yarn through and leave the stitch on the knitting needle.


      Repeat these next few steps until you have grafted all of the stitches together. It may help you to remember the steps if you think,"Knit, purl-purl, knit"

     Insert your needle into the first stitch on the front knitting needle as if to knit, while slipping the stitch off of the knitting needle.


     Now, insert your needle into the first stitch on the front knitting needle as if to purl. Pull the yarn through.


     Insert your needle into the first stitch on the back knitting needle as if to purl, and pull the stitch off of the knitting needle.


     Finally, insert your needle into the first stitch on the back knitting needle as if to knit. Pull the yarn through.


     Your grafted stitches should be almost indistinguishable from your knitted stitches.


Friday, April 25, 2014

How to: The Russian Join

     The Russian Join is useful for those of us (like me) who don't particularly enjoy weaving in ends. It has saved me a lot of time on projects and it is also almost seamless! Can you tell where I switched yarns in my Luna Lovegood scarf?


     To do the Russian Join, you will need:
1) two strands/skeins of yarn (my example is in two different colors, but I don't know how well that would turn out in a project)

2) a large-eyed needle


     Thread one strand of yarn through the needle.


    Insert the needle into the center of the strand of yarn.


     Gently pull the end of the needle through and remove the yarn from the needle. This will leave a loop at the end.


     Thread your next strand of yarn.


     Insert the needle through the loop in the previous strand of yarn.


     Insert the needle through the center of the strand of yarn just like before.


     Gently pull the end of the needle through and remove the yarn from the needle. It will now look like this.


     Tighten the loops, trim the ends of the yarn, and continue knitting or crocheting!


Wednesday, April 23, 2014

How to: Tunisian Scallop Lace

     Because of all of the steps in this lace pattern, it seems complex at first, but after a while it does get a lot easier!

     To begin, chain a number divisible by five and add two. 
     Now, complete a forward and return pass [to learn this, see How to Tunisian Crochet (The Simple Stitch)].


     Crochet the next row in the simple stitch.


     Chain three.


     Yarn over and pull it through six stitches. Do this at the beginning of each pattern row.


     This next part you will repeat until there are two stitches left on your hook.

     Chain four.


     Yarn over, and pull it through six stitches.


     When you have two stitches left on your hook, Chain two.


     Yarn over, and pull it through the two stitches.


     When you do a forward pass, pick up the loops over each cluster and chain. You should get your original number of stitches.
     Crochet a row of the simple stitch between each row of the scallop pattern.

     After a few rows, your work will look like this!