How to Crochet Intarsia
First, you are going to need a chart (written instructions are fine also but charts are more fun!).
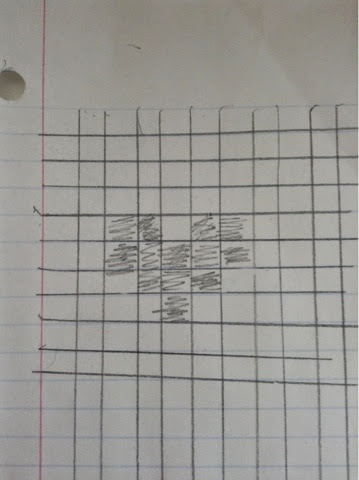
You can make your own chart using graph paper and shading in each square/stitch you want in a different color. This is the basic chart I made.
Sc up to the stitch before you need to change colors. Insert your hook into the next stitch like you normally would, yarn over, and pull through. You will now have two loops on your hook. Do not complete your sc stitch.
Move the yarn to the front of your work.
Now, here comes the fun part. Hold your new color in your left hand like this.
Place it gently on your hook, with the end facing you and complete the sc stitch. (This also works when you are making stripes. Just introduce the new color when you chain one at the beginning of a round.)
Sc to the stitch before the new color and don't finish it. Introduce the gray and don't finish that stitch. Then, introduce another strand of white and sc as normal.
Continue the pattern and your work will look like this.
You will have A LOT of strands of yarn at the back of your work to weave in later!
How to Knit Intarsia
Note: This is knitted in stockinette stitch.
Cast on 10 stitches and knit one row. Purl the next row.
Insert your needle into the first stitch as if to knit. Introduce white like the previous example, and knit the amount of stitches indicated on the chart.
You will notice that all of your color changes are separated by gaps. This will be fixed in the next row.
Purl the amount of stitches indicated on the chart. Don't pick up your next color from the back of your work yet.
Because the next color (gray) is to your left, you will have to wrap the yarn under and over the white yarn (I promise the wrapping isn't as complicated as it sounds!).
The wrapping will keep your work nice and neat! Change colors and continue to wrap this way as long as the new yarn is to your left.
Knit the next row until you need to change colors again. This time, the new yarn will be on your right.
Simply place the old yarn (white) over your new yarn (gray), and knit with your new color!
After you complete the chart, your swatch will look like this.
Weave in all of the ends in the back once you're finished.
If you are feeling adventurous, here are some free Harry Potter charts. They would make an awesome blanket! Create Capture Teach: Harry Potter Blanket Squares
You can also get plenty of charts and patterns from AllFreeCrochet.com - Free Crochet Patterns, Crochet Projects, Tips, Video, How-To Crochet and More and AllFreeKnitting.com - Free Knitting Patterns, Knitting Tips, How-To Knit, Videos, Hints and More!


You can find Free Knitting Patterns online with a quick search on any of the search engines. But if you are searching for knitting patterns, is this really the best way to get it done? A lot of that depends on what kind of knitting or crochet patterns you are looking for online as well as what you plan to do with them once you have them.
ReplyDeleteHowever, one thing that most people do not realise is that when you give up using synthetics and turn to eco friendly, bok sticka
ReplyDelete